(→Probabilities:
Added miss chance to grey die) Tags: Visual edit apiedit |
No edit summary Tag: Visual edit |
||
| (18 intermediate revisions by 7 users not shown) | |||
| Line 1: | Line 1: | ||
| − | [[Image: |
+ | [[Image:Dice.png|600px|center]] |
| + | There are 7 different dice in [[Descent: Journeys in the Dark (Second Edition)]] grouped into three types. |
||
| ⚫ | |||
| + | [[Image:All_Dice.jpg|thumb|right|300px|All sides of all dice]] |
||
| ⚫ | |||
| ⚫ | |||
| ⚫ | |||
| ⚫ | |||
| ⚫ | |||
==Probabilities== |
==Probabilities== |
||
| Line 34: | Line 36: | ||
| style="background:#1F5D04; color:#FFFFFF; font-size:100%; border:1px solid #aaa;" colspan="2" | Shields |
| style="background:#1F5D04; color:#FFFFFF; font-size:100%; border:1px solid #aaa;" colspan="2" | Shields |
||
|- |
|- |
||
| − | | Miss (X) || 1/6 || || Range 1 || |
+ | | Miss (X) || 1/6 || || Range 1 || 3/6 || || Range 1 || 3/6 || || 1 {{heart}} || 6/6 || || 1 {{shield}} || 3/6 || || 1 {{shield}} || 5/6 || || rowspan="2" | 2 {{shield}}|| rowspan="2" | 5/6 |
|- |
|- |
||
| − | | Range 2 || |
+ | | Range 2 || 5/6 || || Range 2 || 1/6 || |
| style="background:#1F5D04; color:#FFFFFF; font-size:100%; border:1px solid #aaa;" colspan="2" | Hearts |
| style="background:#1F5D04; color:#FFFFFF; font-size:100%; border:1px solid #aaa;" colspan="2" | Hearts |
||
| |
| |
||
| − | | 2 {{heart}} || 5/6 || || 2 {{shield}} || 1/6 || || 2 {{shield}} || 2/6 || |
+ | | 2 {{heart}} || 5/6 || || 2 {{shield}} || 1/6 || || 2 {{shield}} || 2/6 || |
|- |
|- |
||
| − | | Range 3 || |
+ | | Range 3 || 4/6 || |
| style="background:#1F5D04; color:#FFFFFF; font-size:100%; border:1px solid #aaa;" colspan="2" | Hearts |
| style="background:#1F5D04; color:#FFFFFF; font-size:100%; border:1px solid #aaa;" colspan="2" | Hearts |
||
| |
| |
||
| 1 {{heart}} || 4/6 || ||3 {{heart}} || 2/6 || || Miss || 3/6 || || 3 {{shield}} || 1/6 || || 3 {{shield}} || 2/6 |
| 1 {{heart}} || 4/6 || ||3 {{heart}} || 2/6 || || Miss || 3/6 || || 3 {{shield}} || 1/6 || || 3 {{shield}} || 2/6 |
||
|- |
|- |
||
| − | | Range 4 || |
+ | | Range 4 || 3/6 || || 1 {{heart}} || 5/6 || |
| style="background:#1F5D04; color:#FFFFFF; font-size:100%; border:1px solid #aaa;" colspan="2" | Surges |
| style="background:#1F5D04; color:#FFFFFF; font-size:100%; border:1px solid #aaa;" colspan="2" | Surges |
||
| |
| |
||
| Line 52: | Line 54: | ||
| || || || || Miss|| 1/6|| || 4 {{shield}} || 1/6 |
| || || || || Miss|| 1/6|| || 4 {{shield}} || 1/6 |
||
|- |
|- |
||
| − | | Range 5 || |
+ | | Range 5 || 2/6 || || 2 {{heart}} || 2/6 || || 1 {{surge}} || 4/6 || || 1 {{surge}} || 1/6 || || || || || || || || Miss || 1/6 |
|- |
|- |
||
| Range 6 || 1/6 || |
| Range 6 || 1/6 || |
||
| Line 70: | Line 72: | ||
|} |
|} |
||
| + | * Note, the displayed probabilities for Range, {{heart}} and {{shield}} are the probabilities the respective die roll will result in ''at least'' that much |
||
| − | *''"At least" odds presented for Defense die''. |
||
{| border="0" cellpadding="5" |
{| border="0" cellpadding="5" |
||
| Line 85: | Line 87: | ||
| style="text-align:center;"|4.7 |
| style="text-align:center;"|4.7 |
||
| style="text-align:center;"|2.8 |
| style="text-align:center;"|2.8 |
||
| − | | style="text-align:center;"| |
+ | | style="text-align:center;" |69% |
| − | | style="text-align:center;"| |
+ | | style="text-align:center;"|20% |
| style="text-align:center;"|0% |
| style="text-align:center;"|0% |
||
| style="text-align:center;"|17% |
| style="text-align:center;"|17% |
||
| Line 93: | Line 95: | ||
| style="text-align:center;"|4.0 |
| style="text-align:center;"|4.0 |
||
| style="text-align:center;"|3.8 |
| style="text-align:center;"|3.8 |
||
| − | | style="text-align:center;"| |
+ | | style="text-align:center;"|50% |
| − | | style="text-align:center;"| |
+ | | style="text-align:center;"|7% |
| style="text-align:center;"|0% |
| style="text-align:center;"|0% |
||
| style="text-align:center;"|17% |
| style="text-align:center;"|17% |
||
| Line 101: | Line 103: | ||
| style="text-align:center;"|5.3 |
| style="text-align:center;"|5.3 |
||
| style="text-align:center;"|3.9 |
| style="text-align:center;"|3.9 |
||
| − | | style="text-align:center;"| |
+ | | style="text-align:center;"|85% |
| − | | style="text-align:center;"| |
+ | | style="text-align:center;"|45% |
| − | | style="text-align:center;"| |
+ | | style="text-align:center;"|10% |
| style="text-align:center;"|17% |
| style="text-align:center;"|17% |
||
|- |
|- |
||
| Line 109: | Line 111: | ||
| style="text-align:center;"|4.7 |
| style="text-align:center;"|4.7 |
||
| style="text-align:center;"|4.9 |
| style="text-align:center;"|4.9 |
||
| − | | style="text-align:center;"| |
+ | | style="text-align:center;"|75% |
| − | | style="text-align:center;"| |
+ | | style="text-align:center;"|28% |
| style="text-align:center;"|3% |
| style="text-align:center;"|3% |
||
| style="text-align:center;"|17% |
| style="text-align:center;"|17% |
||
| Line 117: | Line 119: | ||
| style="text-align:center;"|4.0 |
| style="text-align:center;"|4.0 |
||
| style="text-align:center;"|5.9 |
| style="text-align:center;"|5.9 |
||
| − | | style="text-align:center;"| |
+ | | style="text-align:center;"|58% |
| − | | style="text-align:center;"| |
+ | | style="text-align:center;"|14% |
| style="text-align:center;"|1% |
| style="text-align:center;"|1% |
||
| style="text-align:center;"|17% |
| style="text-align:center;"|17% |
||
|- |
|- |
||
|Blue/Green |
|Blue/Green |
||
| − | | style="text-align:center;"| |
+ | | style="text-align:center;"|4.5 |
| − | | style="text-align:center;"| |
+ | | style="text-align:center;"|2.3 |
| − | | style="text-align:center;"| |
+ | | style="text-align:center;"|80% |
| − | | style="text-align:center;"| |
+ | | style="text-align:center;"|27% |
| − | | style="text-align:center;"| |
+ | | style="text-align:center;"|0% |
| style="text-align:center;"|17% |
| style="text-align:center;"|17% |
||
|- |
|- |
||
|Blue/Red/Green |
|Blue/Red/Green |
||
| − | | style="text-align:center;"| |
+ | | style="text-align:center;"|4.5 |
| − | | style="text-align:center;"| |
+ | | style="text-align:center;"|4.4 |
| − | | style="text-align:center;"| |
+ | | style="text-align:center;"|83% |
| − | | style="text-align:center;"| |
+ | | style="text-align:center;"|36% |
| − | | style="text-align:center;"| |
+ | | style="text-align:center;"|4% |
| style="text-align:center;"|17% |
| style="text-align:center;"|17% |
||
|- |
|- |
||
|Blue/Yellow/Green |
|Blue/Yellow/Green |
||
| − | | style="text-align:center;"| |
+ | | style="text-align:center;"|5.2 |
| − | | style="text-align:center;"| |
+ | | style="text-align:center;"|3.4 |
| − | | style="text-align:center;"| |
+ | | style="text-align:center;"|90% |
| − | | style="text-align:center;"| |
+ | | style="text-align:center;"|53% |
| − | | style="text-align:center;"| |
+ | | style="text-align:center;"|13% |
| style="text-align:center;"|17% |
| style="text-align:center;"|17% |
||
|- |
|- |
||
|Blue/Green/Green |
|Blue/Green/Green |
||
| − | | style="text-align:center;"| |
+ | | style="text-align:center;"|5.0 |
| − | | style="text-align:center;"| |
+ | | style="text-align:center;"|2.9 |
| − | | style="text-align:center;"| |
+ | | style="text-align:center;"|93% |
| − | | style="text-align:center;"| |
+ | | style="text-align:center;"|62% |
| − | | style="text-align:center;"| |
+ | | style="text-align:center;"|18% |
| style="text-align:center;"|17% |
| style="text-align:center;"|17% |
||
| + | |- |
||
| + | |B/Y/Y/Y |
||
| + | | style="text-align:center;" |6.5 |
||
| + | | style="text-align:center;" |5.1 |
||
| + | | |
||
| + | | |
||
| + | | |
||
| + | | style="text-align:center;" |17% |
||
| + | |- |
||
| + | |B/Y/Y/R |
||
| + | | style="text-align:center;" |5.7 |
||
| + | | style="text-align:center;" |6.1 |
||
| + | | |
||
| + | | |
||
| + | | |
||
| + | | style="text-align:center;" |17% |
||
| + | |- |
||
| + | |B/Y/Y/G |
||
| + | | style="text-align:center;" |6.2 |
||
| + | | style="text-align:center;" |4.6 |
||
| + | | |
||
| + | | |
||
| + | | |
||
| + | | style="text-align:center;" |17% |
||
| + | |- |
||
| + | |B/Y/R/R |
||
| + | | style="text-align:center;" |4.8 |
||
| + | | style="text-align:center;" |7.1 |
||
| + | | |
||
| + | | |
||
| + | | |
||
| + | | style="text-align:center;" |17% |
||
| + | |- |
||
| + | |B/Y/R/G |
||
| + | | style="text-align:center;" |5.3 |
||
| + | | style="text-align:center;" |5.6 |
||
| + | | |
||
| + | | |
||
| + | | |
||
| + | | style="text-align:center;" |17% |
||
| + | |- |
||
| + | |B/Y/G/G |
||
| + | | style="text-align:center;" |5.8 |
||
| + | | style="text-align:center;" |4.1 |
||
| + | | |
||
| + | | |
||
| + | | |
||
| + | | style="text-align:center;" |17% |
||
| + | |- |
||
| + | |B/R/R/R |
||
| + | | style="text-align:center;" |4 |
||
| + | | style="text-align:center;" |8.1 |
||
| + | | |
||
| + | | |
||
| + | | |
||
| + | | style="text-align:center;" |17% |
||
| + | |- |
||
| + | |B/R/R/G |
||
| + | | style="text-align:center;" |4.5 |
||
| + | | style="text-align:center;" |6.5 |
||
| + | | |
||
| + | | |
||
| + | | |
||
| + | | style="text-align:center;" |17% |
||
| + | |- |
||
| + | |B/R/G/G |
||
| + | | style="text-align:center;" |5 |
||
| + | | style="text-align:center;" |5.1 |
||
| + | | |
||
| + | | |
||
| + | | |
||
| + | | style="text-align:center;" |17% |
||
| + | |- |
||
| + | |B/G/G/G |
||
| + | | style="text-align:center;" |5.5 |
||
| + | | style="text-align:center;" |3.6 |
||
| + | | |
||
| + | | |
||
| + | | |
||
| + | | style="text-align:center;" |17% |
||
| + | |- |
||
| + | |R/R/G/G |
||
| + | | style="text-align:center;" |1 |
||
| + | | style="text-align:center;" |5.7 |
||
| + | | |
||
| + | | |
||
| + | | |
||
| + | | style="text-align:center;" |0% |
||
|} |
|} |
||
| + | The table above assumes the attack is not a miss (excludes this as a possible result). The probabilities including the possibility of a miss is 0.83 multiplied by the values listed. |
||
| + | |||
| + | ===Attribute Tests=== |
||
| + | |||
| + | Attribute tests are made with 1 Gray die + 1 Black die. Your attribute must be equal to or greater than the number of {{Shield}} you roll. |
||
| + | |||
| + | The '''Lucky''' column assumes a hero will use [[Lucky Charm]] to reroll in case of failure. The '''Fortune''' column assumes an Overlord will use [[Dark Fortune]] or a hero will use [[Fortuna's Dice]] to reroll one of the dice in case of initial failure. The '''Wicked''' column assumes an Overlord will use [[Wicked Laughter]] if a hero initially passes their attribute test. The '''Wicked''' column also applies to [[Befuddle]], except that for the Attribute 0 row, the probability of success is exactly 0. |
||
| + | |||
| + | {| border="1" |
||
| + | |- |
||
| + | !Attribute |
||
| + | !Pass |
||
| + | ![[Lucky Charm|Lucky]] |
||
| + | ![[Dark Fortune|Fortune]] |
||
| + | ![[Wicked Laughter|Wicked]] |
||
| + | |- |
||
| + | | style="text-align:center;" | 0 |
||
| + | | style="text-align:right;" | 2.8% |
||
| + | | style="text-align:right;" | 5.5% |
||
| + | | style="text-align:right;" | 7.4% |
||
| + | | style="text-align:right;" | 0.1% |
||
| + | |- |
||
| + | | style="text-align:center;" | 1 |
||
| + | | style="text-align:right;" | 11.1% |
||
| + | | style="text-align:right;" | 21.0% |
||
| + | | style="text-align:right;" | 24.1% |
||
| + | | style="text-align:right;" | 0.3% |
||
| + | |- |
||
| + | | style="text-align:center;" | 2 |
||
| + | | style="text-align:right;" | 22.2% |
||
| + | | style="text-align:right;" | 39.5% |
||
| + | | style="text-align:right;" | 38.9% |
||
| + | | style="text-align:right;" | 2.5% |
||
| + | |- |
||
| + | | style="text-align:center;" | 3 |
||
| + | | style="text-align:right;" | 52.8% |
||
| + | | style="text-align:right;" | 77.7% |
||
| + | | style="text-align:right;" | 79.2% |
||
| + | | style="text-align:right;" | 11.7% |
||
| + | |- |
||
| + | | style="text-align:center;" | 4 |
||
| + | | style="text-align:right;" | 72.2% |
||
| + | | style="text-align:right;" | 92.3% |
||
| + | | style="text-align:right;" | 92.1% |
||
| + | | style="text-align:right;" | 38.1% |
||
| + | |- |
||
| + | | style="text-align:center;" | 5 |
||
| + | | style="text-align:right;" | 91.7% |
||
| + | | style="text-align:right;" | 99.3% |
||
| + | | style="text-align:right;" | 98.1% |
||
| + | | style="text-align:right;" | 66.2% |
||
| + | |- |
||
| + | | style="text-align:center;" | 6 |
||
| + | | style="text-align:right;" | 97.2% |
||
| + | | style="text-align:right;" | 99.9% |
||
| + | | style="text-align:right;" | 99.5% |
||
| + | | style="text-align:right;" | 89.1% |
||
| + | |- |
||
| + | | style="text-align:center;" | 7 |
||
| + | | style="text-align:right;" | 100% |
||
| + | | style="text-align:right;" | 100% |
||
| + | | style="text-align:right;" | 100% |
||
| + | | style="text-align:right;" | 97.2% |
||
| + | |}<ref>python 2.7 code to generate this table: http://pastebin.com/qPuxv6ti</ref> |
||
| + | |||
| + | =References= |
||
| + | <references /> |
||
[[Category:Mechanic]] |
[[Category:Mechanic]] |
||
[[Category:Overview]] |
[[Category:Overview]] |
||
Latest revision as of 22:40, 12 October 2021
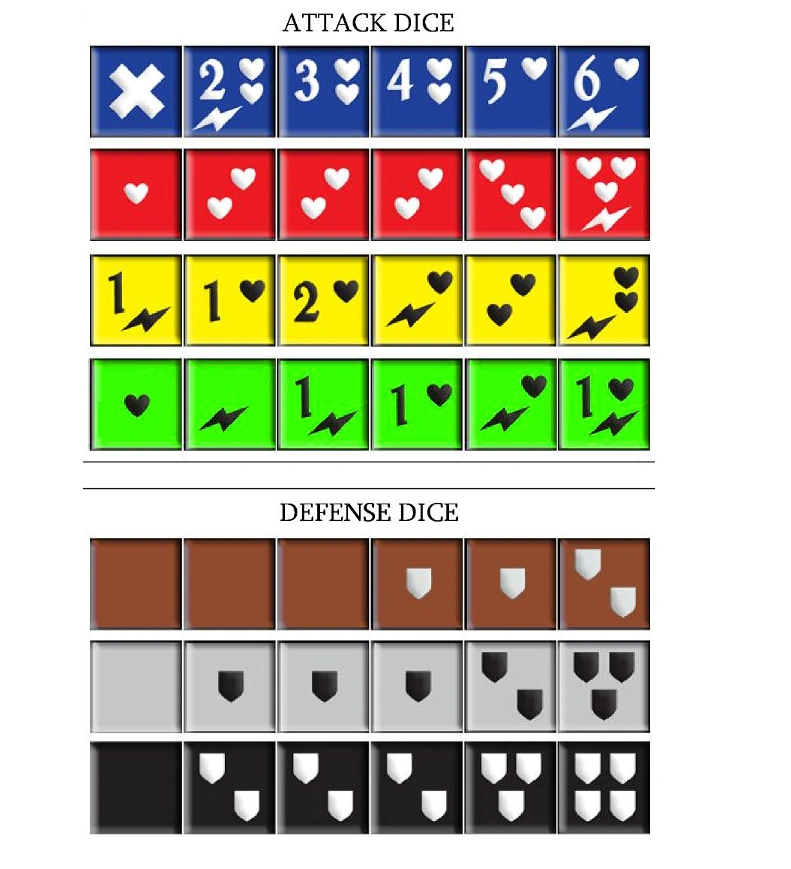
There are 7 different dice in Descent: Journeys in the Dark (Second Edition) grouped into three types.

All sides of all dice
- The Blue die is called the Attack Die, and is used for almost[1] every attack. Please note that not every damage-dealing ability is an attack.
- The Yellow, Red, and Green dice are called the Power Dice, and are usually used in conjunction with the Blue die to roll "an attack." Only the Yellow and Red power dice were included in the Base Game; the Green power dice were added in later expansions.
- The Brown, Gray, and Black dice are called the Defense Dice, and are usually used to defend against an attack, while the Gray and Black dice are used together for
 ,
,  , , and tests.
Probabilities[]
| Blue | Yellow | Green | Red | Brown | Gray | Black | |||||||||||||
|---|---|---|---|---|---|---|---|---|---|---|---|---|---|---|---|---|---|---|---|
| Range | Range | Range | Hearts | Shields | Shields | Shields | |||||||||||||
| Miss (X) | 1/6 | Range 1 | 3/6 | Range 1 | 3/6 | 1 |
6/6 | 1 |
3/6 | 1 |
5/6 | 2 |
5/6 | ||||||
| Range 2 | 5/6 | Range 2 | 1/6 | Hearts | 2 |
5/6 | 2 |
1/6 | 2 |
2/6 | |||||||||
| Range 3 | 4/6 | Hearts | 1 |
4/6 | 3 |
2/6 | Miss | 3/6 | 3 |
1/6 | 3 |
2/6 | |||||||
| Range 4 | 3/6 | 1 |
5/6 | Surges | Surges | Miss | 1/6 | 4 |
1/6 | ||||||||||
| Range 5 | 2/6 | 2 |
2/6 | 1 |
4/6 | 1 |
1/6 | Miss | 1/6 | ||||||||||
| Range 6 | 1/6 | Surges | |||||||||||||||||
| Hearts | 1 |
3/6 | |||||||||||||||||
| 1 |
5/6 | ||||||||||||||||||
| 2 |
3/6 | ||||||||||||||||||
| Surges | |||||||||||||||||||
| 1 |
2/6 | ||||||||||||||||||
- Note, the displayed probabilities for Range, and are the probabilities the respective die roll will result in at least that much
| Combo | Average Range | Average |
Chance for 1 or more |
Chance for 2 or more |
Chance for 3 |
Chance to Miss |
|---|---|---|---|---|---|---|
| Blue/Yellow | 4.7 | 2.8 | 69% | 20% | 0% | 17% |
| Blue/Red | 4.0 | 3.8 | 50% | 7% | 0% | 17% |
| Blue/Yellow/Yellow | 5.3 | 3.9 | 85% | 45% | 10% | 17% |
| Blue/Yellow/Red | 4.7 | 4.9 | 75% | 28% | 3% | 17% |
| Blue/Red/Red | 4.0 | 5.9 | 58% | 14% | 1% | 17% |
| Blue/Green | 4.5 | 2.3 | 80% | 27% | 0% | 17% |
| Blue/Red/Green | 4.5 | 4.4 | 83% | 36% | 4% | 17% |
| Blue/Yellow/Green | 5.2 | 3.4 | 90% | 53% | 13% | 17% |
| Blue/Green/Green | 5.0 | 2.9 | 93% | 62% | 18% | 17% |
| B/Y/Y/Y | 6.5 | 5.1 | 17% | |||
| B/Y/Y/R | 5.7 | 6.1 | 17% | |||
| B/Y/Y/G | 6.2 | 4.6 | 17% | |||
| B/Y/R/R | 4.8 | 7.1 | 17% | |||
| B/Y/R/G | 5.3 | 5.6 | 17% | |||
| B/Y/G/G | 5.8 | 4.1 | 17% | |||
| B/R/R/R | 4 | 8.1 | 17% | |||
| B/R/R/G | 4.5 | 6.5 | 17% | |||
| B/R/G/G | 5 | 5.1 | 17% | |||
| B/G/G/G | 5.5 | 3.6 | 17% | |||
| R/R/G/G | 1 | 5.7 | 0% |
The table above assumes the attack is not a miss (excludes this as a possible result). The probabilities including the possibility of a miss is 0.83 multiplied by the values listed.
Attribute Tests[]
Attribute tests are made with 1 Gray die + 1 Black die. Your attribute must be equal to or greater than the number of ![]() you roll.
you roll.
The Lucky column assumes a hero will use Lucky Charm to reroll in case of failure. The Fortune column assumes an Overlord will use Dark Fortune or a hero will use Fortuna's Dice to reroll one of the dice in case of initial failure. The Wicked column assumes an Overlord will use Wicked Laughter if a hero initially passes their attribute test. The Wicked column also applies to Befuddle, except that for the Attribute 0 row, the probability of success is exactly 0.
| Attribute | Pass | Lucky | Fortune | Wicked |
|---|---|---|---|---|
| 0 | 2.8% | 5.5% | 7.4% | 0.1% |
| 1 | 11.1% | 21.0% | 24.1% | 0.3% |
| 2 | 22.2% | 39.5% | 38.9% | 2.5% |
| 3 | 52.8% | 77.7% | 79.2% | 11.7% |
| 4 | 72.2% | 92.3% | 92.1% | 38.1% |
| 5 | 91.7% | 99.3% | 98.1% | 66.2% |
| 6 | 97.2% | 99.9% | 99.5% | 89.1% |
| 7 | 100% | 100% | 100% | 97.2% |
References[]
- ↑ Rat Swarm does not use the blue attack die for attacking
- ↑ python 2.7 code to generate this table: http://pastebin.com/qPuxv6ti